
My journey with Mendix started more than four years ago. Due to the nature of my Mendix projects many times I had to use third-party java libraries and based on that experience two years ago I wrote a blog post on Managing java Dependencies for Mendix Modules. Since then, I have gained more insight into this process and wanted to share it with you.
So the goal of this blog post is to document my learnings and best practices for adding a java library to a Mendix project and see how they can be applied in a practical example.
Excited? Let's go!
Best practice
In my opinion, the best way to add a third party dependency to Mendix is to first set up a separate pure java project (using gradle or maven) that includes the dependency and provides an easy-to-use interface. Then use a shadow plugin to generate a so-called fat jar that contains all dependencies and import that to your Mendix project.
This is to an extent the same message from my previous blog post. However, as you will see from the list below by doing things slightly differently, the list of benefits to using this approach can be greatly expanded. Here is a list of advantages of using the above process:
-
Automatically deal with transitive dependencies.
Almost every java library has other java libraries it depends on. Downloading them one by one is cumbersome, error-prone and not maintainable. Gradle and maven both support dependency management out of the box. They will find and download the right dependencies for the library that you plan to use. Also, because all dependencies are in one jar, any dependencies that are no longer needed are automatically removed on build, thus making for an easy update process unlike so many Mendix modules where developers are asked to manually delete unused or old dependencies when upgrading.
-
Avoid version conflicts for transitive dependencies. Unfortunately, Mendix java class loader which is based on OSGI does not handle multiple versions of a dependency. This can be a blocking issue if the library you are trying to use needs to load a specific version of a dependency while Mendix runtime or another Mendix module is using a different version of the same dependency. Thanks to the shadow plugin such dependencies can be shadowed thus enabling the class loader to load them at the same time.
-
Get to know the java library in isolation.
Using a third party library that you are not familiar with is hard enough on its own. Trying to do it in the context of a large Mendix project is a thousand times harder. If something does not work it is impossible to say if the error comes from the library, your java code, the integration between Mendix and java or the Mendix app itself. Also testing and debugging is more complicated and time-consuming when you have to start a Mendix runtime every time.
-
Code to the interface that you want.
Many times the java library will have a complicated interface to use. This is java after all so in order to do something as simple as a function call you will probably need to go through the usual list of suspects: factories, builders and managers until you have an object that you can actually call the method on. It is best to hide this complexity away and build a simple adapter/facade that has the interface that you want and need. An added bonus is that you can swap out the third-party library for another without having to touch the Mendix application.
-
Easily set up unit tests that serve as a regression suite.
This is so important I would like to repeat it ten times in this list. When something does not work in a complex app it is very hard to pinpoint the exact location of the failure. So having some tests gives you a very easy way to check if the problem is in the third-party library or somewhere else in your Mendix logic. Another good reason to have tests is to reduce the risks associated with making changes to your code or upgrading the library to a new version. You could theoretically do this in Mendix but that is much more complicated, resource and time intensive and harder to integrate in your build process compared to gradle or maven.
-
Separate version control.
This is a minor point, but I really prefer keeping the dependencies in separate repositories. Plus you can use a different version control (git) system since you are not limited by Mendix (svn). And git already has good templates for both gradle and maven ignore lists.
Step-by-step guide
To make the above best practice more grounded lets go over the steps for adding a concrete third-party library. How about a markdown parser ? The one module in the Mendix app store about markdown conversion is now 7 years old and uses a deprecated library that is no longer maintained so this would be a nice upgrade.
The goal is to use this library in a Mendix project to convert some markdown text to HTML.
Prerequisites
I will be using Gradle for this guide. Maven can do exactly the same.
Gradle v5.5: can be installed by following the official tutorial . Newer or older versions should also work but this is the one used in this tutorial. It is a command line tool that takes care of dependency management, shadowing and building.
Step 1: Initialize the project
Create a new git project in an empty directory. Then open a command line window and type:
gradle init
This will start the process of setting up a gradle project. Follow the instructions and choose carefully, I recommend the choices below, but you might have other preferences:
-
project type: 3: library (no need for a main method)
-
language: 3: java
-
build script: 1: groovy
-
test framework: 1: JUnit4
Once the init command is finished it would have generated a project file structure similar to:
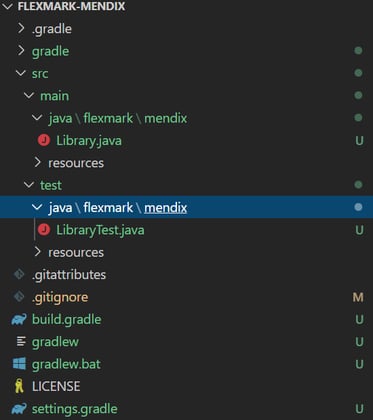
Some important places that we will use are:
-
src \ main - this is where the java code goes
-
src \ test - this is where the test code goes
-
build.gradle - define dependencies, plugins and more
Step 2: Adding a dependency via gradle
The easiest way to do this is to head over to the Maven Repository and search for the dependency you want to add. For example, this is the flexmark dependency On this page there is a code snippet with the command that you can use to add this dependency to your gradle project.
compile group: 'com.vladsch.flexmark', name: 'flexmark-all', version: '0.62.2'
Copy this code snippet and add it to the build.gradle file under dependencies. You can remove other compile dependencies that gradle added automatically, they are just there as an example, but make sure to leave the test dependency in, otherwise the tests will not work.
Step 3: Write and implement an interface to the third party library
Finally, it is time to write some code. You can use any editor or IDE, but I found that IntelliJ works most reliably with gradle. This is important because without resolving the class path to find the gradle dependencies your code will not compile and will throw many errors (and no autocomplete).
Below is a simple interface for converting markdown to HTML and a class that implements it (which I mostly copied from here).
package flexmark.mendix;

import com.vladsch.flexmark.html.HtmlRenderer;
import com.vladsch.flexmark.parser.Parser;
import com.vladsch.flexmark.util.ast.Node;
import com.vladsch.flexmark.util.data.MutableDataSet;

public interface MarkdownToHTMLConverter {

 // main method
 String convert(String markdown);

 // factory method
 static MarkdownToHTMLConverter create() {
 return new FlexmarkConverter();
 }
}

class FlexmarkConverter implements MarkdownToHTMLConverter {

 @Override
 public String convert(String markdown) {
 MutableDataSet options = new MutableDataSet();
 Parser parser = Parser.builder(options).build();
 HtmlRenderer renderer = HtmlRenderer.builder(options).build();
 Node document = parser.parse(markdown);
 String html = renderer.render(document);
 return html;
 }
}
Step 4: Writing unit tests
Since this is a library project it does not have a main class. The easiest way to check if something is working is by writing a test. This is actually perfect because it forces us to write tests which we can use whenever we make changes in the future to verify that everything is working correctly.
For the purpose of the post I will add a single simple test. For production usage make sure that your tests cover all aspects of the library that you are planning to use and have realistic input. But do not go overboard, the goal is not to test the library itself, since it is probably well tested already.
package flexmark.mendix;import org.junit.Assert;import org.junit.Test;public class MarkdownToHTMLConverterTest {@Test public void basicTest() {MarkdownToHTMLConverter converter = MarkdownToHTMLConverter.createConverter();Assert.assertEquals("<p>This is <em>Sparta</em></p>\n", converter.convert("This is *Sparta*"));}}
The test can be started from IntelliJ by clicking on the little green Run button. If the tests pass the next step is to package (build) the library so that it can be imported in our Mendix project.
Step 5: Building a fat jar
This feature does not come out of the box with gradle so first we need to install a gradle plugin.
Add the following code snippet at the top of the build.gradle file under plugins (above java)
id 'com.github.johnrengelman.shadow' version '5.1.0'
This adds the plugin to the project and lets us use new commands with gradle. In a command line window type:
gradle shadowJar
This will produce a single jar file that contains all dependencies under build\\libs\\. This process needs to be repeated every time you make changes to the code or dependencies.
Step 6: Shadowing
Shadowing is the process of renaming java packages on byte code level to allow for two packages with the same name to be used in the one java app. This is usually done to avoid version conflicts between two different versions of a package. In gradle packages can be shadowed by adding the following snippet at the bottom of the build.gradle file.
shadowJar { relocate 'org.apache', 'flexmark.mendix.org.apache' }
This will rename all java packages starting with org.apache to flexmark.mendix.org.apache . To confirm that the renaming worked, check the jar file contents with a zip inspector like 7-zip.
To be future proof, it is best to shadow all dependencies, even ones that might not be causing a problem today. Multiple dependencies can be shadowed by adding multiple relocate lines.
Unfortunately, shadowing does not handle libraries that rely on reflection, so if you run into a class loading issue it might be needed to un-shadow the culprit libraries.
Step 7: Using the library in Mendix
Copy the fat jar from build\\libs\\ to your Mendix project directory in the userlib folder.
Then create a Mendix Java action so that the java library can be called from a microflow. The number and type of parameters and return values will vary depending on the use case. Designing good java actions probably deserves a separate blog post. Here I will only mention one trick:
Name the parameters with an underscore at the end. This prevents a known Mendix issue where if a parameter name is a reserved word it will be suffixed in java. The underscore prevents this from happening and is actually not visible when calling the java action in a microflow.
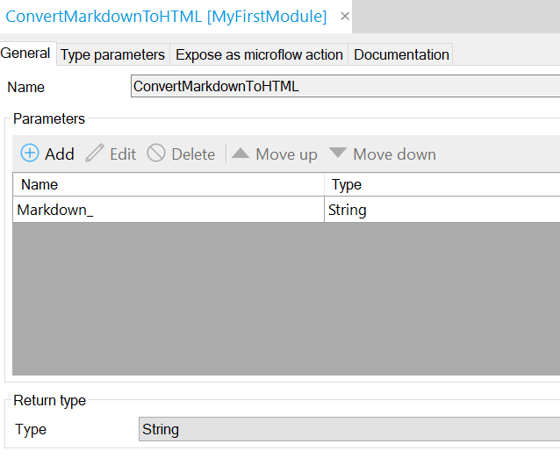
Finally, call the interface that was coded in step 3 from the java action. Because we use a facade to hide away the complexity of the third party library this part is often only a line or two.
import flexmark.mendix.MarkdownToHTMLConverter;// LINES OMMITED FOR BREVITY
@java.lang.Override
public java.lang.String executeAction() throws Exception
{
// BEGIN USER CODE
MarkdownToHTMLConverter converter = MarkdownToHTMLConverter.create();
return converter.convert(Markdown_);
// END USER CODE
}
That concludes the step-by-step guide. You can find the entire source code at https://github.com/gajduk/flexmark-mendix.
Wrap up
Adding java libraries to Mendix can be quite tricky. Simply throwing things in the userlib folder is bound to get you into trouble. Over the years I ran into many problems around this which led me to develop the process I described above.
My process is far from perfect though, so if you have any suggestions for improvements please reach out to me via Mendix slack or email, it would be great to learn more.
What is your process for adding third-party dependencies?
I hope you liked this blog post and that it helps you more easily work with java dependencies.